
Part Two: Low Back & Hips
There are so many reasons you may experience pain in the low back, the most common ones tend to be from either a muscle imbalance or a structural issue. Let’s look at how our bodies have been engineered to deal with walking upright and battling gravity all day, starting with the spine.
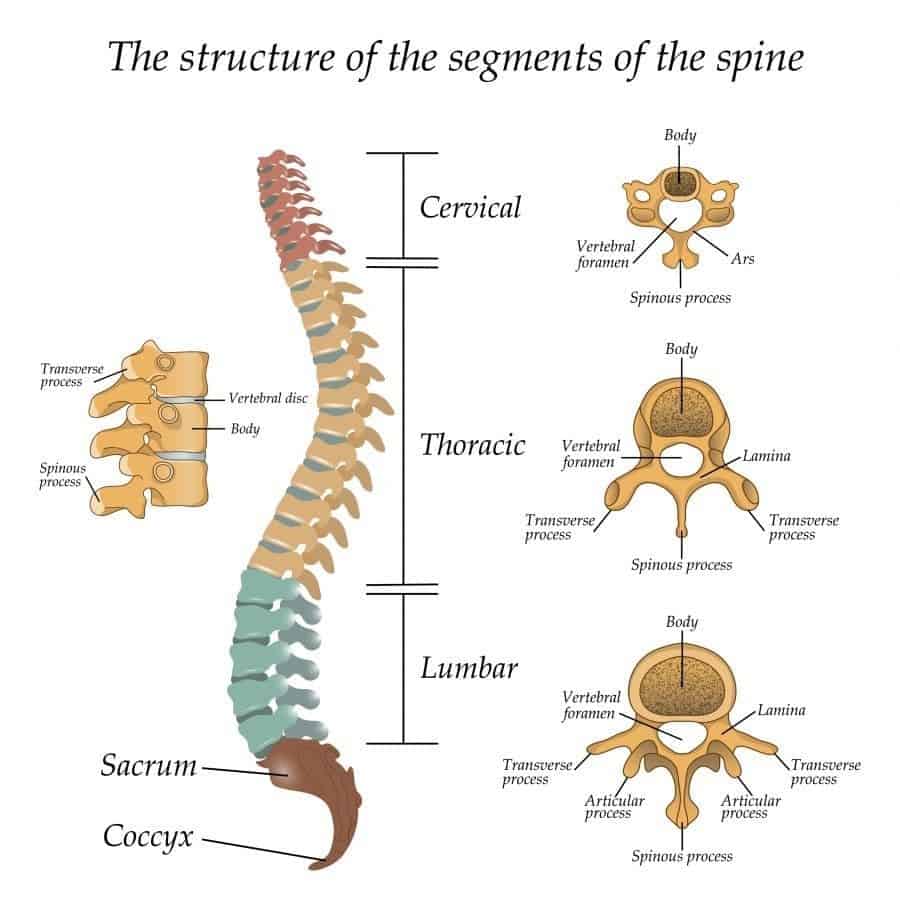
Our spine is comprised of 3 segments of independently articulating bones, or vertebrae (Cervical, Thoracic and Lumbar) and 2 fused areas (Sacrum and Coccyx). When you look at the spine, you can see that the vertebrae get larger and less mobile as you move down. This makes sense when you think of the force of gravity pushing down on us at all times. The lower (lumbar) vertebrae are going to be the most weight-bearing. To help out with bearing this pressure we have intervertebral discs, the spine’s shock absorbers. Bone is not meant to rest against bone, so these discs keep them separated and provide cushioning to prevent wearing of the bone. This also provides intervertebral space for our nerves to exit the spinal cord and innervate our bodies. The base of the spine articulates with our Sacrum, the triangle bone, which in turn joins with our pelvis. At the base of the Sacrum, our coccyx (or tailbone) hangs off the end. This part of the spine is vestigial (unnecessary leftover) and not really noticeable unless you injure it, then you know exactly where it is!
Some of the structural reasons for lower back pain have to do with either deformation or degradation of these bones. Osteoarthritis (wear and tear of joints causing inflammation) in this area can cause bony outgrowths that can impinge nerves; degradations of the spinal discs result in decreased intervertebral space also resulting in impinged nerves and causing arthritis; spinal stenosis (narrowing of the spinal canal) can also impinge nerves. Are you seeing a trend here? When we compress our spinal nerves, they can become highly overactive causing pain (usually shooting or electric in feeling), and can over-stimulate musculature in the area and relay too many signals to the nerves that branch out of them. When it comes to structural reasons for lower back pain, it is best to have the area examined by a medical professional. If you have had x-rays and there is no evidence of issues with the bones, it is time to look into any muscle imbalances and how to resolve them.
As with any area of the body, we have so many muscles to help us with the large degree of movement that we are so lucky to have. Today we will focus on our paraspinal (around the spine), gluteal, and hip flexor muscles. Luckily, these are all areas we can use self-massage on, so let’s get out those balls you have from last week’s massage. Once again, you will need 2 balls and an area of both wall and floor to work on.
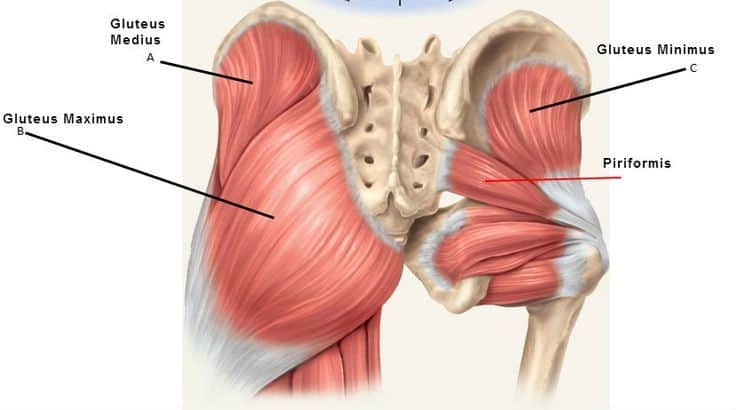
We will start with our backs up against the wall with 1 ball. Place the ball into the fleshy centre of one side of your glutes (backside) and start to lightly move the ball around to warm up the area. As we learned last week you want to start the massage light and broad then move on to a firmer and more specific pressure. Keep the ball in that fleshy area of the gluts, remembering one of the golden rules of massage: No pressure on the bone, we cannot change the bone with massage, and it hurts! When you are massaging lightly and broadly, you are working on your Gluteus Maximus, the largest and most superficial gluteal muscle. This muscle attaches all along the upper pelvis and into the Ischial tuberosity (the bony protrusion that you feel when you sit) and is responsible for extending your leg backwards, like if you were kicking something behind you. Now that the superficial muscle layer is warmed up and relaxed, we can get a little more specific. We want to get into all of the muscles as they all work hard, not only with their specific movement but in stabilizing the whole pelvis too.
Begin with the ball on the upper area of the glut, right under your iliac crest (upper hip bone edge). Underneath the Gluteus Maximus, we have a second layer, our Gluteus Medius and Minimis. These two muscles run across the upper region from the edge of the top of the Ilium (pelvis) to the greater trochanter (a bony protrusion) of the Femur (thigh) bone, resulting in internal rotation and abduction (moving away from the body) of the leg. And they can get feisty! After massaging along the iliac insertions with the ball in a side to side movement, slowly bring the ball across the upper gluts towards the hip. You will feel a slight dip as the muscle go over the fanned and recessed area of the pelvis. Slow the ball down and push into the wall. Use small back and forth motions to get into muscles, maybe even stopping completely on those tender points for a few seconds to release. Reach down with your hand to find the greater trochanter of your femur. This will be a bony protrusion on the outside of your very upper leg. Using that landmark, continue to bring the ball to the outside of the leg, right up to the trochanter. Again, using an up and down movement with the ball, massage these insertions of the glute muscles. Bring your ball and yourself back to the centre and massage broadly around once more for a little feel-good massage before we get into the Piriformis muscle.
Our Piriformis muscle is quite the low back trouble maker. It runs from the outer edge of the Sacrum to the greater trochanter of the Femur and externally rotates the leg. Due to its positioning, it is working all the time to help stabilize the pelvis. It also runs across the path of the sciatic nerve (our body’s largest nerve), so depending on your unique anatomy, the actual sciatic nerve can run in front, behind, or through the muscle. If you are one of the people that have the nerve running through the muscle, you may have experienced what is called “Pseudo-sciatica”, where a tight piriformis causes shooting pain down your leg. Massaging and releasing this muscle can help with that and general low back pain! So let’s bring the ball back to the centre of the gluts, along the outer edge of the sacrum. Move the ball around a bit until you feel an almost burning-like sensation, this is your Piriformis muscle. Now move the ball slowly back and forth across the glut, along the length of the muscle. If you get to a spot that gives you a little jolt, that is most likely your sciatic nerve, move along as we do not want to do massage any nerves today (or ever really). Bring the ball around to the greater trochanter once more and this time, move the ball all the way around (not over) the whole protrusion in a circular motion. Now bring the ball to the front of the thigh and lightly massage through the upper thigh to relax the upper portion of your quadriceps, some of our hip flexors. For this massage routine, it is best to continue with the other side of your gluts before moving up into the lower back.

Once you have completed both sides of the gluts, you may already be feeling better through the lower back. Let’s do a bit of massage now right in the lumbar region. *Please do not use too much pressure in this area. It is naturally sensitive as it houses our kidneys, the only organs in the body that are not fully protected by our rib cage.* Last week you worked on the upper Erector Spinae muscles, the thick band of muscle running parallel to our spines, today you can work the bottom portion. With the ball placed just above the crest of your hip and beside the spine, it is time for some more squats! As you slowly squat, the ball will move up along the erectors and back down again as you stand back up. Start lightly and slowly increase the pressure to your tolerance. Now bring the ball back to the bottom and start to bring it back and forth above the crest of your hip bone. This will target the insertions of your Quadratus Lumborum (QL) muscle. This muscle attaches to your spine and the ribs above and lifts the hip up. This is another muscle that can feel quite fiery when massaged so go light and slowly while you figure yours out. Turn towards and away from the wall slightly to get into the muscle with side to side and up and down motions. Finish with a general and broad massage of the area before continuing to the other side. And of course, always finish the massage with lighter, broader strokes all over to flush the area.
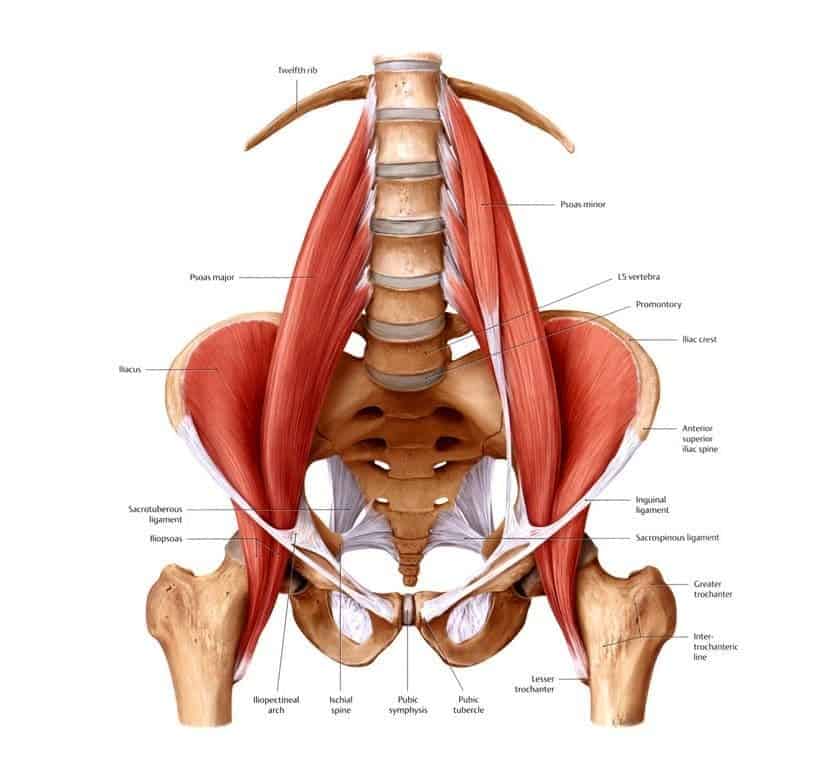
Lastly, we will target our deep hip flexor, the Iliopsoas, on the floor using 2 balls. This muscle group runs from the anterior (front) surface of your Lumbar vertebrae, down along the inside of the pelvis and through to the inside of the Femur. When it contracts it flexes your hip, raising your thigh. It is helped by one of the Quadriceps, however, the Iliopsoas is the main mover and it gets tight! Think about how many steps you might take in a day, plus it is also in a contracted position when you sit down. Because of how it is placed in the body, it can cause trouble through the low back and hips. If you do need this area massaged and released fully, it is best to seek out a trained professional, however, we can do a small release with the massage balls laying on our belly on the floor. First, lay down on your back and feel for the front of your hip bones, then bring your hands just inside of that area and landmark the area. Roll yourself onto your belly and place a ball under each side where you just landmarked. Stay here for as long as you like. If you have your head turned to one side, remember to switch sides so you don’t imbalance your neck muscles. When you are ready to get up, remove the balls and roll onto your back. Bend your knees and plant your feet on the floor a hip-distance apart. Let both your knees drop to the same side and then the other, like windshield washers for a minute or so. Rollover into a fetal position for a few moments then use your arms to push yourself up. Hopefully, you feel a little less tension and some more freedom of movement in your low back and hips.
Now that we have learned how to massage the torso, next week we will focus on arms and legs.
Have a wonderful week and stay well everybody!